
Ansys Student Installation
Follow our tutorial and ensure the correct installation of the Ansys Student package on your desktop.
Before you begin the installation:
- Make sure that the computer meets the technical requirements necessary to run the software package;
- Check if you have access as administrator of the computer on which Ansys Student will be installed;
- Uninstall any other Ansys product on your computer. Installing the Ansys Student package will replace existing licenses;
- Make sure you have the license key available. The license must be downloaded separately inthe Ansys downloadsection.
If you have any questions, please check the InstallationVideo Tutorial and FAQ.
Installation Process:
After downloading and starting the installation of the Student Ansys package, download and run the license file. Follow all the installation steps in sequence (parts 1, 2 and 3);
Part 1 – Ansys Student Installation
- Unzip the installation files;
- In the extracted files folder, right-click on thesetup.exe and select the Run as administratoroption;
- Click the text Install Ansys, Inc. Products;
- Read and accept the terms to continue;
- Click the Next button to accept the default values throughout the installation. Skip the Enter License Server Specification;
- After completing the installation, click Next. You will see a message highlighted as Important indicating that the installation has been completed;
- Check the search box at the bottom if you want to submit the search;
- Click the Exit button. You will be returned to the Version 16.2 Installation page. Be sure not to select options not supported by the Ansys Student package;
- Select Exit. Then install the Ansys License File, described in part 2.
Part 2 – Ansys Student License
- Download the Student Ansys license generator file – ansys_student_yyyymmdd.lic – to the computer. The part of the file name indicates the expiration date of the license file;
- Extract the license file and note where to save it:
- We recommend moving the license file to C: \ Program Files \ Ansys Inc \ Shared Files \ Licensing, but you can also put the license on the desktop;
- Avoid placing the license file in a Temp directory;
- Do not save the license file using Microsoft Word.
- Set the environment variable ANSYSLMD_LICENSE_FILE to the location of the ansys_student_.lic including the file name. For example: C: \ ansys_inc \ ansys_student_20160131.lic.
- Follow the steps below to set an environment variable in Windows:
- Open the Control Panel;
- Select System and Security;
- Select System;
- Select Advanced System Settings;
- Click the Environment Variables button;
- Select the New button below the system variables.
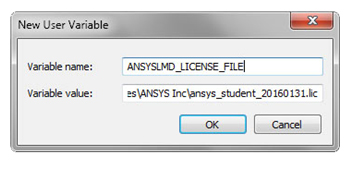
* Note that there will be other variables with similar names and care to use exactly this name for the environment variable.
Part 3 – Running the Student Ansys
- After completing steps 1 and 2 of the installation, it is recommended that you restart your computer. The best way to access Ansys Student is from the start menu:
- Open the Start menu and select the 16.2 Workbench or All Programs option, then choose the Ansys 16.2 folder and click Workbench 16.2
- The Ansys Student Workbench 16.2 home page will open. Now you can start using Ansys Student!
Video Tutorials
Ansys has assembled videos tutorials that helped in the installation of Ansys Student:
Ansys Student Installation
Windows Firewall Configuration for Ansys Student License Manager (Ansys License Manager)